Saturday 30 November 2013

Christmas Dining Room Box

A close-up photo of the Christmas tree with flashing lights and all the cards and presents made from the sheet of Christmas printies from DHEAustralia.  
Today, December 1st, I finished my Dining Room Box decorated for Christmas Dinner. The table is set and everything is ready for the family to come in, sit down and start celebrating.  The presents are piled under and around the Christmas tree and old Uncle Dave has come in early, dressed in his wonderful red Santa Claus suit and beard, all ready to start handing out the presents.  I had as much fun wrapping the mini-presents as I will have wrapping the real-life ones.  The mini-papers, Christmas cards and bunting flags all came from a fabulous sheet of Christmas Printies from Dolls House Emporium.   A lot of the furniture and the Christmas tree and lights also came from Dolls House Emporium. The rug on the floor was hand-made by my long-time friend, Jenni Kirkham and the carpet was bought to match the colour in the rug........in fact everything in the dining room was bought to match the rug even the blue and white china. I still need to add a light fitting and cornices around the ceiling but they can come later.....
This is the completed dining room with the presents piled up in front of the fireplace all ready for the family to open.  Santa Claus (aka old Uncle Dave) is surveying the scene.

Another view of the dining room showing the trifle and the Punch bowl on the sideboard. Old Uncle Dave looks as if he has already been sampling the punch!


Right-hand side of the dining room, showing the glass cabinet with my collection of miniature glassware.

Monday 25 November 2013

My Christmas Dinner setting to be in the Mini treasures Wiki Advent Calendar!

I am so thrilled because Linda from Mini treasuresWiki has asked if she can include my Christmas Dinner setting into their 2013 Advent Calendar.  Of course she can!!  I feel very honoured to be invited.  Here is a link to the Mini treasures advent calendar from 2011 but from there be prepared to spend a couple of hours browsing through the articles and links to other blogs and websites.  http://minitreasures.pbworks.com/w/page/47492443/advent_calendar_2011
Lots of lovely How-tos and printies to see, make and share.  I love this site and will go back time and time again. Thanks so much Linda for showing me your Mini treasures Wiki blog.

Saturday 23 November 2013

Table set for Christmas Dinner

I spent the whole day working on the Christmas Dinner table for my dining room box.  There is a tropical cyclone up north of Western Australia which means that we down south get cloudy, humid weather that is perfect for staying inside and working on miniatures.  I didn't want the Christmas table to be permanent just in case I want to change it later so I devised a method of making the whole table top removable.

1. I made a template on white card by tracing around the table top.
2. Step two was to glue a piece of dark brown felt on top of the cardboard shape. I used the nearest coloured felt that I could get to the stain of the furniture.
3. I cut the table cloth from a linen handkerchief and I unpicked the lace from around the edge of a cotton handkerchief because it was exactly what was in my head for my Christmas look.  I used the cardboard shape that I traced from the actual table cloth as a template again and measured 1 1/2 inches out from the edge all the way around.  Then I hem-stitched a 1/16th inch turned hem all around the edge by hand which was more difficult than I thought it would be because of the curved ends. Lastly, I slip-stitched the lace on top of the hem.
4. I put a length of double-sided tape around the edge of the table top and then laid the felt covered card shape on top of the table.
5. Finally I laid the table cloth over the top of the felt and lightly pressed it to the double-sided tape with my fingers so that it folded over the edge of the table like a real one would and didn't stick out straight from the table edge.


Every plate, knife, fork, spoon, cracker and food is all stuck to the tablecloth with tiny pieces of double-sided tape so that I can pick the table up and nothing moves or falls off.  When I am ready to change my table, all I have to do is ease the table-cloth away from the double sided tape and the whole thing will lift off, still attached to the felt-covered cardboard.

The table looks pretty bare with only the meat and vegetables but the sideboard which will be on the side of the dining-room will have a full punch bowl with tiny glass cups, a Christmas Cake and a trifle.  There is no Christmas Pudding because personally, I hate Christmas Pudding, it's too rich, I much prefer the trifle.

Hmmm, that cyclone has caused us to have showers, the rain is bucketing down right now, I might go and do something else mini like make some jewellery on display stands for my future "Ladieswear Shop" which will sell mini dresses, underclothes, hats, accessories and perfumes.  However, that is for 2014, I need to finish the diningroom with the tree, stockings and presents first.......my brain, as usual, is racing ahead of my hands!!


Friday 15 November 2013

FINISHED Nursery Room Box for my Sister

Here we have Nanny nursing the baby while her older siblings look on.  Over on the side of the room are her twin cousins enjoying a bottle of milk each.
Today I finished the room box for my sister's combine birthday and Christmas present.  I finally finished knitting the boy's dark green pullover and changing his flesh coloured legs with white shoes and socks to black stockings and brown boots this morning. His blue denim jeans were removed and replaced with fawn knickbockers. This room box celebrates her year  -  2013  - when the number of her grandchildren grew from two to five.  In May, her son and daughter-in-law had identical twin girls called Casey and Tessa and then in September, her daughter and son-in-law had a third child, another little girl called Madeline Grace.

In the room box, I have included the twins in their cots with a bottle each and in the centre of the room sitting comfortably in her rocking chair is the Nanny introducing little Madeline to her older siblings, Robert and Emilia (Millie).  The children have brought their favourite toys to show the baby, Millie has her Teddy bear while Robert rides his Hobby Horse and pulls his wooden train at the same time (whereas the real-life Robert is into Transformers and Angry Birds!) .

If you can see anything that I can add to this little homely scene, please leave a comment to let me know.

The room box, looking left to the twins beneath their Noah's Ark wallhanging quilt.

This is the right side of the room showing the baby Owl quilt and Madeline's overflowing toybox.

A close-up of the family in the centre.  Nanny with Robert, Emilia (Millie) and Madeline (Maddie).


Thursday 7 November 2013

More mini Straw Hats

I have been having fun with ten more blank hat shapes which I have made whilst sitting in waiting rooms while my husband has been having treatment. It sure beats doing nothing or reading out-of-date magazines!  I got out my box of feathers, flowers, ribbons and braids and spread it all over the dining room table and set to work with glue and needle and thread. The worst part was clearing it all away afterwards so we could sit down to eat!!


Miniature Owls baby quilt finished

This quilt measures 3 3/4 inches x 3 inches (9.5cm x 7.5cm).  The quilting part was fine but getting the folded edge straight was difficult because of the small size. To the naked eye it looks straight but blown up on the computer ........ oh dear!  Still it looks alright with a hanging sleeve at the back and a rod (cut down satay stick) threaded through it.  I had to make the sleeve and rod because the quilt is glued onto a side wall so you can see the side of it and it would have looked a bit silly glued to the wall with no apparent way of hanging it in real life.


Wednesday 6 November 2013

Nursery Change Table - after the DIY fix

I have finished adding bits and pieces to the change table in my sister's room box.  The cupboard is full of miniature towels and face-washers while the little basket on the shelf contains tiny plastic containers of baby items.

This almost ended up as a tragedy because it arrived in the post from England smashed and in a real mess.  It wasn't the fault of the seller because she had packed it securely in it's original box and then in an outer box containing shredded paper.  It looked as if the postal service either here in Australia or in UK had dropped something heavy on it. Unfortunately the seller didn't have another one so she refunded my money but seeing as I really wanted a change table it took a lot of time and patience to get it anywhere near to how it was on ebay. It looks OK and will be against the back wall so Sue won't notice the glued joins (I hope).


These are the outer and inner boxes showing where something heavy had been dropped or pressed against them during transit.  The photo above that shows the condition of the change table when I unpacked it.


Crazy Quilt Bed Quilt

I have been asked if I would move my crazy quilted bed cover from my old blog to my new one seeing as it comes under the umbrella of "tiny textiles".  I can copy it to here and it will be in both places.  So far, I haven't attempted another one of these although I am working on a cream-on-cream one.  Other things keep getting in the way though. Anyway here is the quilt copied from the old blog, heading and all.

Dolls House Size Crazy quilt

Today I finally finished the 1:12 scale crazy quilt that I have been working on for the last two or three weeks.  The whole quilt measure 8 1/4 inches x 7 inches or 21cm x 17.5cm and there must be at least two hundred tiny patches, I haven't counted them all.  Each one is embroidered around all sides just like in a real crazy quilt and the tiny black edging finishes it all off.  The edging was one that I bought in England when we were there two years ago but it was sky blue, so taking up my husband's suggestion, I dyed it black and then slip-stitched it around the edges of the lined quilt once it was dry. I am posting this to both my crazy quilting blog and my doll's house miniature blog because it fits them both.  The straight edge is the top while the curved bottom edge is designed to go down the end and sides of a four-poster bed.
 
I used the stitch and flip method of piecing the tiny patches by hand, using  a  3 mm or 1/8 inch seam and tiny running stitches.


This is a close-up of the bottom right hand corner showing some of the decorative motifs such as a butterfly, Rose spray and fan.


Tuesday 5 November 2013

Quick and Easy Quilted Wall Hangings

My sister is a quilter and makes the most gorgeous wall hanging quilts therefore I wanted to add a couple of quilts to her Nursery Room Box.  The thought of joined hundreds of tiny pieces of material together gave me the heebie-jeebies so I tried this quick and easy method. I'm not sure if it is totally legal but I am not planning on selling them or otherwise making money from them so I hope it is OK.  I looked on the internet images for baby quilts and found a few that I thought my sister would like so I copied and pasted them to Microsoft Publisher.  A Microsoft Word document would do just as well.  Here is the page that I saved......

A selection of four quilts which I figured Sue would like the best from the 100s on the internet.  These are placed on an A4 sheet and when printed out were the perfect size for 1/12th scale wallhangings.  Each one is roughly half of the width of A4 plus borders. This was not a particularly economical way of doing it because I can see that I could have got at least one more quilt on the page but I was raring to go.......


Once I was happy with the results, I printed the page out onto a sheet of fabric attached to paper (I bought a commercial packet of fabric sheets). Then I pulled the paper off the back and cut out the four quilt panels leaving a border around each one.    Here is the finished quilt ready to hang on the dolls house wall.

After I had completed the quilting around all of the lines (including the ark, water and palm trees), I hand-stitched a strip of striped border fabric along one side, cut back the excess fabric and wool felt to 2mm from the stitching line and turned the border fabric over to the back where I glued it down firmly leaving the small striped border at the front.  I worked on one side at a time, stitching, cutting off the excess, folding it over and glueing to the back.   It measures 4 inches or 10cm square and looks just like the real thing.

Monday 4 November 2013

Gathered Knitting Stitch.........Plain and Purl only........Easy!!

This is the pattern I used to knit the two quilts for the cradle and the larger experimental one.  It came from a book published in 1984 called "Knitting Encyclopedia 1500 patterns" by Mon Tricot.  I have never seen it before and it was soooooooo easy!!  I used 1 ply wool and the finest needles that I could find but 3ply baby wool would be OK so long as one set of needles used were two or three sizes larger than the other set.


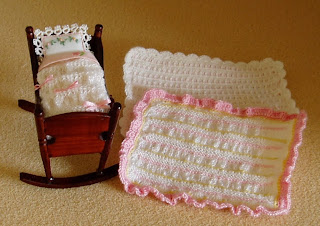
For the tiny quilt I just worked the basic pattern, crocheted a shell edge around the four sides and added some tiny pink bows.  For the larger quilt I made the actual quilt in plain white then worked an edging of single crochet stitches around all four sides in yellow then another row in pink. Finally I crocheted a frill around the edge made up of three treble crochet stitches into every pink single crochet stitch.  Then to finish it off, I stitched a row of pink stem-stitch along the bottom edge of every plain stripe of knitting and a row of yellow thread along the top edge.


Sunday 3 November 2013

Pattern for the Striped quilts

These are crocheted in pastel 1 ply wools but crochet cotton size 14 or 20 would do as well with a 1.25mm hook (US size 10).  I used white plus five pastel colours. Starting with white thread,
1. Make a chain of 46 stitches. 
2. Work a single crochet into every chain.
 Don't cut off white thread, take it up the side of the work.
3. Join in a pastel colour and work a treble crochet into each stitch.  Work two chain to turn.
4. Repeat previous row. Cut thread leaving about 3 inches to use for sewing into the quilt later.
5. Work two rows of sngle crochet with the white again and leave attached on the side.
7. Repeat with another pastel thread working two more rows of trebles.
Alternate with the single crochet rows in white and the treble rows in pastel until the quilt is the desired length ending with a row of single crochet in white.
 Sew all the ends from the pastel threads and the starting thread  from the white thread into the quilt so that are secured and invisible.  Cut off the threads close to the quilt.

With the white thread, work a single crochet into every stitch across the previous row of white sc then down the first side working four stitches into the pastel treble stripes and two stitches into the white stripes. Continue across the other end working one stitch into each of the ones in the first row and the back up along the third side.
Work two more sngle crochet stitches into the two white ones at the end of the row to bring yourself to the corner of the quilt.
 Miss the first sc from the previous row and work five treble stitches into the next stitch.  Miss the next sc from the previous row and work a sc into the next stitch, creating a shell.  Repeat all the way around the quilt and end off with some secure stitches before weaving the tail of white thread into the work and cutting off the excess thread.

Knitted Outfits for the baby and for the Second twin

I wrote about these outfits in my old blog but seeing as this one is all about the Nursery room-box for my sister, I thought that I should include the photo in this blog as well, so here they are again, Casey and her little cousin Madeline.

I used the same stitch on both of these dresses although the white one has the whole skirt knitted in pattern while the  pink one just has a bottom border.  I used the little vintage doll for the baby because my sister bought it many years ago when she thought that she might get into miniatures as well.  Luckily for me, she didn't.........

Components of the Nursery Room Box


Because this room box specifically celebrates the birth of my sister's three grandchildren who were all born in 2013, everything is geared towards the twins who were born at the end of May to her son and dau-in-law and the little girl born in September to her daughter and son-in-law.  By Christmas, I want every drawer and every cupboard filled with goodies for the babies even though no-one will be able to see them unless they either pull out the drawers or open the cupboards.


So here are some of the completed items of furniture which have been finished off with sheets, towels, blankets and quilts not to mention the babies who all have either knitted or crocheted clothes.


These chests of drawers both have the same contents in the drawers, ie. a pair of white towels in the first, a blanket in the second, a pair of coloured sheets in the third and a baby album, metal bootees and a dummy in the fourth.  Behind them is a 4"x6" photo printout of lots of photos of the twins (two copies of each) for me to cut out and glue in the Baby Albums.


These are the twin dolls in their cradles.  Each cradle has a fitted bottom sheet, top sheet, pillow with a pillowcase and a crocheted striped quilt.  Pictured on the flat quilt is the twin in the yellow crocheted dress which, unfortunately I didn't write down the pattern for as I went along.....sorry.

This is the baby's cradle which is smaller than the others.  It has the fitted bottom sheet, top sheet, embroidery pillow and a knitted quilt.  I loved this knitting pattern so much that I made another, bigger quilt with a frill around the edge. The other quilt underneath is a crocheted one in white with a pink thread woven in and out of the treble crochet.

Finally the toy-boxes.  Each box contains an assortment of toys which are glued in place so they are not removable. The twins will have the dark stained toy-boxes while the baby will have the white/yellow one.

Christmas Tree or Fun with the Bead box

I have spent a couple of lovely hours raiding my box of broken jewellery and loose beads from unpicked necklaces and making ornaments and baubles for the dolls house Christmas Tree.  I wired them onto four strings of metal beading then wound them around the tree so that it is like our real size one - dripping in baubles, tinsel and lights.  When I make my dining room box, it is going to be set for Christmas dinner which gives me the excuse to indulge in the best crockery, cutlery and accessories like crackers and napkins with tiny napkin rings, yummy Christmas food and the very best embroidered table cloth to show-case it all.  What tablecloth?  I haven't even thought of that yet....... not to worry, here is the tree finished albeit a bit lop-sided where I pressed it into the corner of the dining-room to see how it would look. So now for the presents to wrap in mini Christmas paper and bows.

Big Sister, Little Sister

These two dolls are going to be maids in the big house.  The smaller doll was supposed to be an old lady with her white hair but her face is really young so she will be a little scullery maid.  Here they are modelling their matching underwear of long pantaloons with matching half petticoats which were cut from a long length of voile with insertion and edging lace.  The length of fabric was originally   part of a job lot of vintage and antique laces that I bought on ebay and I managed to cut five pairs of pantaloons and five petticoats out of it, making sure that the lace edging remained on the bottom edge of each little garment. The Nanny in the rocking chair also wears a set.

Anyway, the story with these two girls are that they are sisters.  The big one is eighteen and has been in service in the big house for six years already while the little one is only twelve and this is her very first day at work. She is extremely nervous (I think you can see that in her anxious little face) so her big sister is making sure that she settles in alright.  I really must start naming my little people, starting with these two.......... I think Charlotte (Lottie) for the big sister and Mary Ann (Polly) for the little one.

Lottie started life as another one of those maid dolls dressed in a plain black dress with a white apron trimmed with nylon lace.  Her petticoat was a smidgin too long so I had to sew a tiny 2mm tuck around the bottom. Unfortunately, part of the original treadle-machine stitching was not quite straight making the hem uneven.  Still, it will be covered up by her dress and no-one will know that a lady sewing a long length of lace to the bottom of the material about a hundred years ago went off the line for a couple of inches!! 


Friday 1 November 2013

Pattern for the Shawl

Using 1 ply wool and a 1.25mm crochet hook make a chain of 41 stitches.
1st row: Turn the work and crochet a row of single crochet (sc) into the chain (40 stitches).
2nd row: Work another row of single crochet into the first row.  This creates a solid edge.
Work three chain as a turning chain.
3rd row:  Miss first sc, work a sc into the 2nd stitch, 3 ch, miss the next sc and work a sc into the following stitch.  Work across the row with three chain loops joined with a sc into each alternate sc from the previous row. Turn work.
4th row: 2 slip-stitches to the top of the first 3ch loop.  Work another row of 3ch loops with a sc into each 3ch loop from the previous row.
5th row: 2 slip-stitches to the top of the first 3ch loop. Work a row to 3ch loops with a sc into the each 3ch from the previous row until you get to the last 3ch loop.  Instead of making a final 3 ch loop, make a treble crochet stitch into the last sc of the previous row which keeps you at the top of the last loop instead of slip-stitching your way back to the top of the loop and it begins the decreasing at the end of each row.
6th row: Work 2 chain loops across the row with a sc into each 3ch loop of the previous row until you get to the last loop, 1 double crochet (dc) into the last loop of the previous row.  Turn work.
7th row: Work 2 ch loops into each loop of the previous row until you get to the last loop, work 1 dc into the last loop.  Turn work.
Continue on decreasing at the end of each row until the last row has a single 2ch loop.  End off and sew the beginning and ending threads into the triangular shawl and cut off.
Using the wool doubled, cut into 5 or 6 cm lengths.  Make a fringe by attaching a double loop (ie. 4 threads) into the loop at the end of each row.  Trim the fringe to the desired length.  I cut mine back to 1cm long.  The photo shows the fringe at the original lengh of 2.5 cm before trimming.

The Nanny in the Nursery - or maybe the Granny?

Naturally with five children to look after, the lady of the house needed a Nanny to care for them all.  I wanted an older lady with grey or white hair and found this one on ebay as part of a family set.
As usual the doll was dressed in an "Edwardian" dress which was glued to her body with a ruffle of black nylon lace around her neck.  While I liked her face and was happy with her hair-do (there was not much I could do about the hair-do anyway - it was too high to put a hat on her head), she wasn't the type of older lady that I wanted.  I wanted someone more homely, not someone who was about to go out the door to visit friends.


Here she is again........this time with long pants, petticoat, blouse, skirt and shawl looking much more like the Nanny or Granny that I was looking for.  The blouse was made from a length of broderie anglaise insertion lace while the shawl was crocheted. She is sitting in her rocking chair and is all ready to hold the baby.

Nursery Room Box for my Sister

This is the empty Nursery room box which I am making for my sister for her combined birthday and Christmas presents.  During 2013, her son and daughter-in-law presented her with identical twin girls and later on her daughter and son-in-law had a third child, another girl.  So this year my sister has gone from two grandchildren (a boy aged 6 and a girl aged 3 1/2) to having five grandchildren.  Because she is retiring to a country town in 2014 and won't be seeing so much of her littlies, I thought I would make her the room-box  to play with.
The Nursery is very pale and pastel at the moment with curtains made from very vintage Swiss voile trimmed with a miniature trim in ivory.  The fantastic windows came from The Dollhouse and Miniature Shop maintained by "dollhousebytherobinsnest" who sell the flat-backed windows on ebay especially for room boxes.  The images behind the windows were cut from a calendar of English village scenes and I managed to get both images from one page on the calendar which means that the view flows from one window across to the other. 


1/12th Scale Straw hats

I have made these hats from mini-hat straw which I bought in UK. This is the first few as I have made several more "blank" hats which still need to be decorated with ribbons, flowers and feathers. Most of my inspiration comes from illustrations from Edwardian clothing catalogues and fashion plates - I love those huge, overly-embellished hats from that period.  I think my favourite hat among this lot is the black one with two tiny real Peacock feathers on the sides and also the one with the red feather and the binding and flowers made from red and turquoise silk fabric. The outfit that will go with this one will be a matching checked skirt and a black silk jacket trimmed with tiny red braid.


Winter Bride


I have just finished this doll who is dressed as a Winter bride.  She started out just wearing a cream "Walking Dress" but the dress got prettier and prettier so at some stage, it turned into a wedding dress, or rather, a wedding skirt and jacket.  Underneath, she is wearing long pantaloons, a straight basic petticoat, a full frilled petticoat then the skirt and the jacket.  Her veil is very delicate, being made from net that is about the same vintage as the bride is supposed to be, ie. 1890-1900. This doll started out as the one second from right in my collection of broken and damaged dolls. Her hip and thigh have been mended with air-drying clay so from the outside at least, she looks as good as new.  Her dress is made from a Ladies pyjama top which I bought for $5 at St Vinnies Charity shop and the roses are rolled ribbon roses made from 3mm variegated apricot silk ribbon.

Winter bride, showing skirt with apron and jacket top with collar and fitted cuffs which are trimmed with tiny pearl "buttons".

Rear view of the bride doll, showing the bustle and fitted jacket through the genuine antique veil.

Winter bride, showing skirt with apron and jacket top with collar and fitted cuffs.  

From humble maid to Lady of the Manor

Here is the first doll to undergo the transformation.  I actually finished up with three of these maids with the same black dress, white apron with the dreaded nylon lace glued on in pleats around the edge and identical hair-do.  When I eventually do a maid, she will have a striped dress and an antique broderie anglaise apron but in the meantime, here is a Lady customer from the late Victorian period in a very posh walking gown.

From this:
Here is the doll in her original maids outfit - lots of glued nylon lace and a black cotton dress.

To this:


 Another added bonus is the grey fabric of the dress.  I paid $1 for a grey shirt-blouse at a charity shop which I thought was "polished cotton".  It wasn't until I got home and started to cut it up that I noticed the tag down the bottom near the hem which said 100% Pure Silk!!! Wowee! That was the best $1 that I ever spent!! This whole outfit was sewn by hand with tiny running stitches as I didn't want to ruin it by sewing on the machine and getting it wrong. I dyed the tatted edging the same sludgy pink as the pleated ribbon which I bought way back in 1995 by mail order from England. I've looked everywhere on-line and I can't find it anymore. The furry fringe down either side of the centre front panel was a heavy gimp braid which was just the right colour. I unpicked it back to the last layer and it looked like a looped fringe. Once I had sewn it on to the dress, I cut it back to 1/4 inch wide and worked the Feather Stitch embroidery with some antique silk thread which again was just the right colour. Her hat had to have a large top to cover that large "bun" on top of her head but it suits the outfit anyway and was trimmed with the same unpicked gimp braid as the dress (with the loopy fringe left uncut) and a couple of satin ribbon roses. So far I have made her two totally different handbags and I have discarded them both because they were not quite right. So until I get her a decent handbag, she is still a work in progress.
So one down, seven to go!!!!!

From Rags to Riches and beyond.......

I have just discovered the joys of dressing 1/12th scale dolls - ever since I watched every episode of " The Paradise" on television and became totally fascinated in the gorgeous Edwardian costumes.  So, my next project will be a mini-Paradise Ladies Wear Shop circa 1890-1910......my shop will sell ladies dresses, skirts, blouses and jackets; hats; handbags; fans - in fact accessories of all types.  Just thinking of the fun I am going to have sends me into raptures of delight - really it does!!  So in anticipation of all the mini-models, customers and shop assistants that are going to inhabit my shop, I got what I consider to be a marvelous buy on ebay.  SIX dressed dolls, all damaged.  Broken porcelain hips, legs, feet - nothing that couldn't be mended and besides they will all get covered up eventually. Also two other dolls that I bought cheap separately from the rest because they were also damaged.
I stripped all the clothes off the dolls - they were glued on anyway.  I am on the war-path against glue and nylon lace. The clothes on these dolls were cheap and cheerful with modern materials and minimal stitching....just more globs of glue and yards and yards of nylon lace!!!  So watch this space as all of these ladies get transformed.
 The dolls from left to right: the first doll was missing a leg. She now has a clay one and both will be painted to represent black stockings. Second doll had a cracked foot and the transfer of her face has slipped so that one eye is higher than the other. The third doll only had her rolled fringe of hair around the front of her face unattached, fourth and fifth dolls had broken pelvises (exactly the same break on each doll where their legs had been strung on back to front and then someone had tried to twist the doll around to match the legs).  Both have been restrung and their torsos glued together and secured with glued gauze. Sixth doll had a foot broken into three pieces, seventh doll had a broken hip (she still has the top of one thigh missing) and the last doll had both legs glued on too far which made her way too short. The pipe-cleaners have been extended so that she is more in proportion.


My new blog - Continued on from my old blog because Google made it too hard to log in with my old email addy!!

After struggling for ages to get into my previous blogger blogs mainly because I could no longer log in using my "alternate" email address which is my main, normal address, I have been obliged to give in and create this new blog using my "gmail" email addy.  Complaint over!!  This is a new start so I will so it differently - instead of lots of "look what I've done" there will be more of "this is how I did it" so I can share my ideas, my patterns and my end results.

I will copy over a lot of the stuff from my old blogs plus I will put links to them in my Blog List so that people can hop from one to the other.  I can still access my old blogs ,ie. Anlaby Dollshouse, Anlabyhouse and Anlaby Trains, I just can't log in to add any further content so here I am..........
My First Room Box - a kitchen scene which  now has a lot more utensils and cooking tools than when I took this photo.
The tiny glass jars behind the cook were full of artificially coloured fake herbs and spices so I emptied them all and filled them with the real thing - Chillies, Ginger, Curry powder, Coriander, Parsley, Turmeric, Sesame seeds, Ground cloves, Poppy seeds, Paprika and others. I think they look a lot more natural now.